I want to sew! Where do I start? Part III, anatomy class.
This is the third part in our beginner blog series. If you haven't read them yet, see Part I here and Part II here
If you are serious about sewing, you will want to invest in a sewing machine. Any kind will do, but there are some features that will make your life easier. Not all sewing machines are the same so it's impossible to tell exactly if/where all of these features are on your machine without seeing it, but your manual will have a diagram. If your machine did not come with a manual, look on the manufacturer's website. Usually they will have their products' manuals in PDF form.
Here I have shown the anatomy of two different sewing machines. The Janome Decor Computer was the first sewing machine that was all mine and was gifted to me in 2005 by my grandparents. The second is the latest addition to the family, a Pfaff Passport. (All of my machines since the Janome have been Pfaff. More on that another time.) This is by no means an exhaustive list, but I hope that it provides a good jumping off point for familiarizing yourself with your own machine.
.jpg)
1) Stitch selector. Both of these machines are digital. To select a stitch, the user pushes buttons (rather than turn a dial). The case of the Pfaff, the user can directly use the number buttons to select a stitch. The Janome requires that users push buttons up or down to select the desired stitch.
2) Needle. It's just not a sewing machine without a needle. Invest in some decent needles and change them often - even if they don't break.
3) Threading path. All of the modern sewing machines I have come across have small indictors as to how the machine must be threaded and in which order.
4) Speed control. If you are doing something particularly tricky, are just starting out, or are having a child learning, this allows you to slow down the machine. You can run the machine faster or slower with the pedal, but this acts like a governor, making sure that the top speed it limited.
5) Hand wheel. This allows the user to manually adjust the needle. It comes in handy when you need to manually advance. Avoid turning it in the reverse direction as you could tangle the thread or change the tension.
6) Sockets for power/pedal cords and on/off switch are usually located here. Some machines have a combined power and pedal plug like this Janome, others have separate cables as the Pfaff does.
7) Stitch library. Most machines come with a preview of the stitches it is capable of. Sometimes it is hidden in a flap or tab (as with the Pfaff) other times it is printed right on the front, as in this Janome.
8) There is usually a thread cutter around here. Some are on the side, some are slightly to the back. Honestly, I don't think I ever use them but it's nice to know they're there.
9) Bobbin winder. You can get an external bobbin winder, but the one on the machine should suffice for most projects.
10) Spool pin. This Janome only has a horizontal thread pin (the place where you put the spool of thread). The Pfaff has a horizontal thread pin and a small hole for attaching a vertical thread pin (usually offered as an accessory).
11) Presser foot lifter. I LOVE when a machine has an automatic presser foot drop/lift at the beginning or end of a line of stitches, but only one of my machines does it. For all the others, this lever allows for manually lowering and lifting the presser foot.
12) Automatic threader. Not every machine has one, but they are wonderful to have. A quick press of this button and a lever comes down, puts a small hook through the eye of the needle so that when you release the lever the thread is pulled through. Now if they could only figure out a way to put these on sergers.
13) Reverse button. This button is primarily for backstitching, though there are certain circumstances in which you would want to sew in reverse. Some machines also use a push of this button to make a tack stitch (repeated stitches in one place to secure the end or beginning of a stitch).
14) Sewing table/ Accessories box. This part of the machine is usually removable for sewing items with smaller openings such as sleeve or pants openings. It also can be opened to store things like extra presser feet and needles. Or candy.
15) In addition to selecting a stitch, these machines allow the user to adjust the width and length of a stitch.
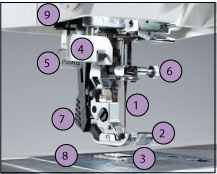
1) Closeup of the needle.
2) Presser foot. There are several types of presser feet, but unless you start to do specialized techniques like making your own welting, rolled or blind hems, quilting, or button holes, you can get away with just the one that comes with the machine.
3) Feed Dogs. These jagged metal pieces help move the fabric under the needle. Interesting note: they were supposed to be called feed cogs but apparently someone misheard and it stuck.
4) Close up look at the automatic threader.
5) On this machine, I have a button hole lever. Yours may not.
6) This screw keeps the needle in place with tension. To change the needle, you will need to loosen the screw, remove the needle, place the new one in the housing, and tighten the screw.
7) This is one of my favorite features on the Pfaff. It is a proprietary piece of equipment that acts like a native walking foot. A walking foot helps to feed the fabric under the needle from the topside. It is VERY handy when working with stretch fabrics.
8) Needle plate cover. Unless you are getting into quilting and things with very small pieces, you won't need to mess with this.
9) You can just see the bottom of the thread cutter on this machine.
Whelp, those are my machines. Does your machine have any features that you just love?